
CCTV VMS MCP
by
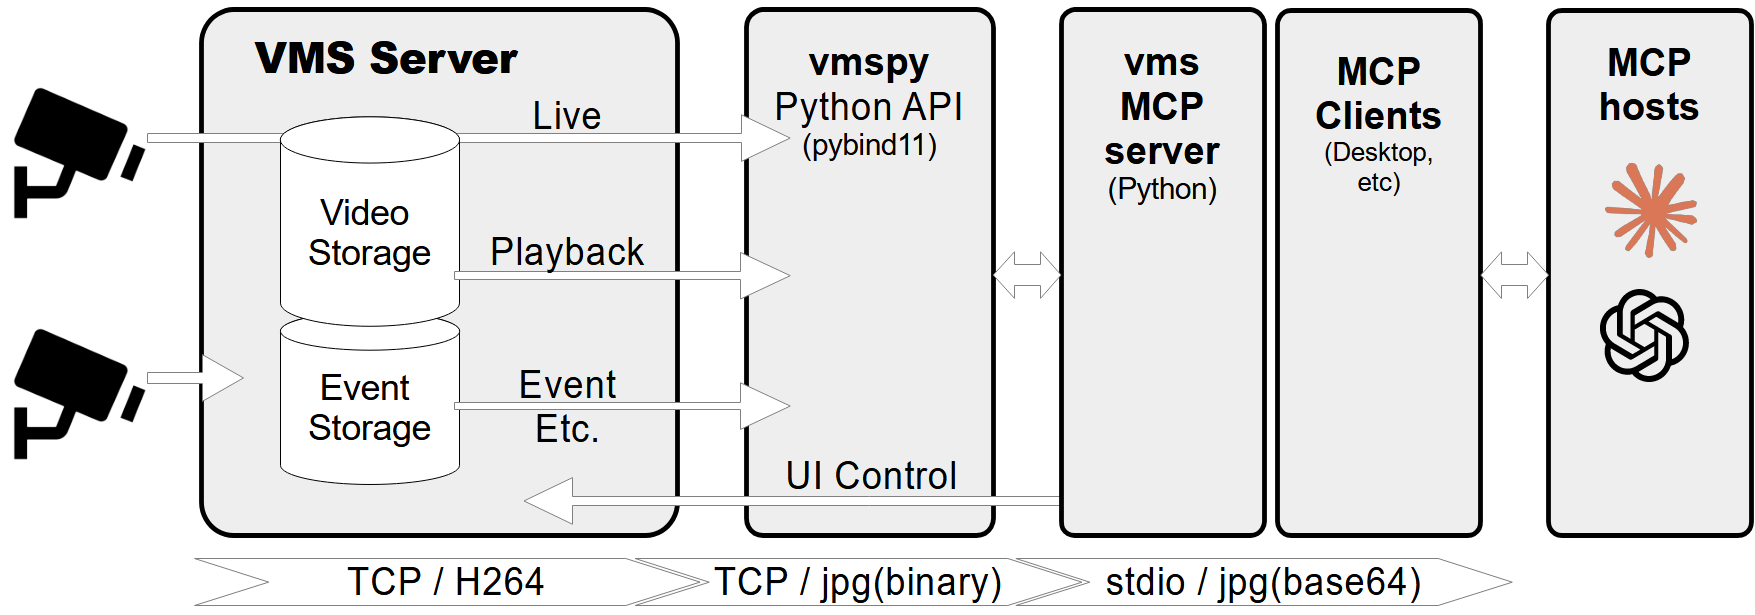
mcp_vms is a Model Context Protocol (MCP) server that connects to CCTV recording programs (VMS) to retrieve and control video streams. It enables integration of surveillance systems with other applications and automation of video stream management.
CCTV VMS MCP Overview
What is mcp_vms?
mcp_vms is a Model Context Protocol (MCP) server designed to connect to a CCTV recording program (VMS) to retrieve recorded and live video streams. It also provides tools to control the VMS software, such as showing live or playback dialogs for specific channels at specified times.
How to use mcp_vms?
To use mcp_vms, you need to follow these steps:
- Install UV Package Manager: Run
powershell -ExecutionPolicy ByPass -c "irm https://astral.sh/uv/install.ps1 | iex"in PowerShell. - Install VMS Server: Download and install the VMS server from http://surveillance-logic.com/en/download.html.
- Install Python Dependencies: Download
vmspy1.4-python3.12-x64.zipfrom https://sourceforge.net/projects/security-vms/files/vmspy1.4-python3.12-x64.zip/download and extract its contents into yourmcp_vmsdirectory. - Configure mcp-server: Set up the
claude_desktop_config.jsonfile with themcpServersconfiguration as shown in the README. - Configure VMS Connection: Modify
mcp_vms_config.pyto set VMS connection parameters likeimg_width,img_height,pixel_format,url,port,access_id, andaccess_pw.
Key Features of mcp_vms
- Retrieve video channel information (connection and recording status).
- Fetch recording dates and times for specific channels.
- Fetch live or recorded images from video channels.
- Show live video streams or playback dialogs for specific channels and timestamps.
- Control PTZ (Pan-Tilt-Zoom) cameras by moving them to preset positions.
- Comprehensive error handling and logging.
Use Cases of mcp_vms
- Integrating CCTV surveillance systems with other applications.
- Building custom video monitoring solutions.
- Automating video stream retrieval and control.
- Developing applications that require interaction with VMS software.
FAQ from mcp_vms
Q: What are the prerequisites for running mcp_vms?
A: You need Python 3.12+, the vmspy library (for VMS integration), and the Pillow library (for image processing).
Q: Where can I download the VMS server? A: You can download the VMS server from http://surveillance-logic.com/en/download.html.
Q: How do I install the vmspy library?
A: Download vmspy1.4-python3.12-x64.zip from the provided SourceForge link and extract its contents into your mcp_vms directory.
CCTV VMS MCP's README
MCP Server - VMS Integration
A Model Context Protocol (MCP) server designed to connect to a CCTV recording program (VMS) to retrieve recorded and live video streams. It also provides tools to control the VMS software, such as showing live or playback dialogs for specific channels at specified times.
Features
- Retrieve video channel information, including connection and recording status.
- Fetch recording dates and times for specific channels.
- Fetch live or recorded images from video channels.
- Show live video streams or playback dialogs for specific channels and timestamps.
- Control PTZ (Pan-Tilt-Zoom) cameras by moving them to preset positions.
- Comprehensive error handling and logging.
Prerequisites
- Python 3.12+
vmspylibrary (for VMS integration)Pillowlibrary (for image processing)
MCP-server Configuration
If you want to use mcp-vms with Claude desktop, you need to set up the claude_desktop_config.json file as follows:
{
  "mcpServers": {
	"vms": {
	  "command": "uv",
	  "args": [
		"--directory",
		"X:\\path\\to\\mcp-vms",
		"run",
		"mcp_vms.py"
	  ]
	}
  }
}
VMS Connection Configuration
The server uses the following default configuration for connecting to the VMS:
- mcp_vms_config.py
vms_config = {
    'img_width': 320,
    'img_height': 240,
    'pixel_format': 'RGB',
    'url': '127.0.0.1',
    'port': 3300,
    'access_id': 'admin',
    'access_pw': 'admin',
}
Installation
1. Install UV Package Manager
Run the following command in PowerShell to install UV:
powershell -ExecutionPolicy ByPass -c "irm https://astral.sh/uv/install.ps1 | iex"
For alternative installation methods, see the official UV documentation.
2.Install VMS Server
Download and install the VMS server from:
http://surveillance-logic.com/en/download.html
(Required before using this MCP server)
3.Install Python Dependencies
Download the vmspy library:
vmspy1.4-python3.12-x64.zip
Extract the contents into your mcp_vms directory
The mcp-vms directory should look like this:
mcp-vms/
├── .gitignore
├── .python-version
├── LICENSE
├── README.md
├── pyproject.toml
├── uv.lock
├── mcp_vms.py            # Main server implementation
├── mcp_vms_config.py     # VMS connection configuration
├── vmspy.pyd             # VMS Python library
├── avcodec-61.dll        # FFmpeg libraries
├── avutil-59.dll
├── swresample-5.dll
├── swscale-8.dll
![]()
CCTV VMS MCP Reviews
Login Required
Please log in to share your review and rating for this MCP.
Related MCP Servers
Discover more MCP servers with similar functionality and use cases
Netdata
by netdata
Real-time, per‑second infrastructure monitoring platform that provides instant insights, auto‑discovery, edge‑based machine‑learning anomaly detection, and lightweight visualizations without requiring complex configuration.
Arize Phoenix
Officialby Arize-ai
Arize Phoenix is an open-source AI and LLM observability tool for inspecting traces, managing prompts, curating datasets, and running experiments.
Tianji
by msgbyte
Provides website analytics, uptime monitoring, and server status in a single self‑hosted application.
MCP Server For Grafana
by grafana
Provides programmatic access to Grafana dashboards, datasources, alerts, incidents, and related operational data through a Model Context Protocol server, enabling AI assistants and automation tools to query and manipulate Grafana resources.
Dynatrace MCP Server
by dynatrace-oss
Provides a local server that enables real‑time interaction with the Dynatrace observability platform, exposing tools for problem retrieval, DQL execution, Slack notifications, workflow automation, and AI‑assisted troubleshooting.
Logfire MCP
by pydantic
Provides tools to retrieve, query, and visualize OpenTelemetry traces and metrics from Pydantic Logfire via a Model Context Protocol server.
VictoriaMetrics MCP Server
by VictoriaMetrics-Community
Access VictoriaMetrics instances through Model Context Protocol, enabling AI assistants and tools to query metrics, explore labels, debug configurations, and retrieve documentation without leaving the conversational interface.
Axiom
Officialby axiomhq
Axiom MCP Server implements the Model Context Protocol (MCP) for Axiom, enabling AI agents to query logs, traces, and other event data using the Axiom Processing Language (APL). It allows AI agents to perform monitoring, observability, and natural language analysis of data for debugging and incident response.
Datadog
by GeLi2001
Datadog MCP Server is a Model Context Protocol (MCP) server that interacts with the official Datadog API. It enables users to access and manage various Datadog functionalities, including monitoring, dashboards, metrics, events, logs, and incidents.